
Keeping your website up to date is essential for professionalism, and one small but important detail is your copyright year in the footer. Instead of manually updating it every year, you can set it up to update automatically using a simple code snippet.
Updating Copyright Year in Widgets
If your theme uses widgets, follow these steps:
- Navigate to Appearance > Widgets.
- Locate the footer widget area.
- Add a Custom HTML block.
- Insert the following code:
© <span id="year"></span> Your Website Name. All Rights Reserved. <script> document.getElementById("year").textContent = new Date().getFullYear(); </script> - Click Update and check your site to confirm the changes.
JavaScript is used here since PHP is not supported in widget areas.
Updating Copyright Year in Elementor Free
If you are using the free version of Elementor, follow these steps:
- Open your WordPress dashboard and go to Appearance > Widgets or Templates > Theme Builder > Footer (if your theme supports footer templates).
- Select the footer section and open it in Elementor.
- Drag and drop a Text Editor widget into your footer area.
- Enter the following text:
© <span id="year"></span> Your Website Name. All Rights Reserved. <script> document.getElementById("year").textContent = new Date().getFullYear(); </script> - Click Update and check your site to confirm the automatic update.
Elementor Free does not support PHP code, so JavaScript is the best way to ensure the year updates automatically.
Recover lost or hacked WordPress password from PHPMyAdmin / MySQL.
Imagine someone somehow manages to break into your WordPress dashboard, and changes it’s password and email. If you request a “Forget Password”, the reset password link will be mailed to the new email, not to your email. The result will be – you losing control over your WordPress-powered site. I think that’s enough to picturize that traumatic situation.
How would you cope up with such a problem? The first recommended step for a beginner-level user to restore WordPress is to contact the Hosting service. The restoration may take sometime, some hours, a day or even more depending on your Hosting provider’s service.
If you can dare to work in the cPanel or the control panel that your service has provided you with; here is a rather quick way to restore your password a few minutes.
Change / Reset WordPress password from MySQL / PHPMyAdmin
In the rest of this article, we’ll see how to reset WordPress password from PHPMyAdmin or MySQL.
Note: Implement only one of the below given methods, either Method#1 or Method#2 since both of these methods are similar and yield the same results. Following one of these two methods will help you to quickly regain control over your hacked WordPress admin account.
Method#1 – The Long way through PHPMyAdmin table editing
This method involves editing and updating the ‘wp_users’ table values to reset our lost WordPress password. The method is little longer but is also easy enough to follow without knowing technical things.
Step 1: Head over to PHPMyAdmin using your cPanel (or the hosting panel that your hosting service supports).
Step 2: Click on your WordPress database.

Step 3: Navigate to and click the table wp_users.

Step 4: Edit the row with your WordPress username.

Step 5: Now, in the user_pass field, change the function to MD5 and enter your new password in the Value section (refer below screenshot).

Step 6: Click “Go” or similar option at the bottom to update the table values.

Method#2 – The Short way through MySQL
This methods implements the direct SQL query execution to update the wp_users table value to reset our hacked WordPress password.
Step 1: Follow the first 3 steps of the above method.
Step 2: Go to SQL or MySQL section in your PHPMyAdmin.

Now, enter the below given query:
UPDATE `wp_users` SET `user_pass`= MD5('yourpassword') WHERE `user_login`='yourusername';Put your new password in place of <your password> and replace <your username> with your WordPress username.
Step 3: Click “Go” or similar option at the bottom to execute the query.
Congrats! You’ve successfully changed your WordPress password and regained the control over your WordPress admin, without even contacting your hosting provider. I found Method#2 very quick to implement, what about you?
Once you’re there, press Shift + F10 to open up a Command Prompt Window and type:
oobe\bypassnro
Once you type in the command, press Enter and your PC will immediately restart.
Now, you should completely disconnect your PC from the Internet at this point. If Windows 11 detects an Internet connection it will continue to try and force you to sign in with a Microsoft account. However, if you’re disconnected from the Internet you’ll see an “I Don’t Have Internet” option, or you’ll be prompted to create a local account immediately.
Click “Continue with limited setup” on the next page if it appears, and then you’ll be able to create a local account with a password and three security questions.
If you’re browsing with Microsoft Edge on Windows 10 or 11 and you visit a site that needs Internet Explorer to work properly, you’re in luck. Edge includes an “Internet Explorer mode” for compatibility. Here’s how to use it.
Warning: Microsoft Edge’s modern browsing engine is more secure (and faster) than Internet Explorer’s old one. You should only use IE mode when absolutely necessary: For example, to access old websites that were designed for Internet Explorer and don’t work properly in modern web browsers.
First, open Edge. In the upper-right corner of any window, click the ellipses button (three dots) and select “Settings” in the menu that appears.
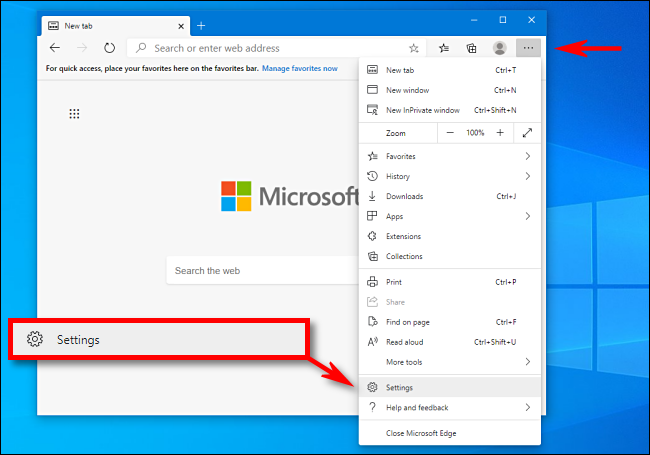
When the Settings tab opens, expand the window until you see the Settings sidebar. Click “Default Browser.”

In Default Browser settings, locate the “Internet Explorer Compatibility” section. Using the drop-down menu beside “Allow sites to be reloaded in Internet Explorer mode,” select “Allow.” Then click “Restart” to restart your browser.

After Edge reloads, browse to the site you’d like to load in Internet Explorer mode. To switch to IE mode, click the ellipses (three dots) button and select “Reload in Internet Explorer mode.” Or you can right-click the tab and select “Reload tab in Internet Explorer mode.”
Edge will reload the site in the Internet Explorer engine, and you’ll see an Internet Explorer icon in the left side of the address bar reminding you that you’re in IE mode.
You’ll also see a strip across the top of the website just under the address bar. If you want to reload the site in Edge, click “Open in Microsoft Edge.” You can also click “Show in Toolbar” to add an icon to your toolbar that you can click to leave IE mode.
Now you can browse as you normally would. To leave Internet Explorer mode, close the tab or click the “Leave IE mode” icon in the toolbar if you added it in the step above.
If you’d like to permanently open a certain website in IE mode, click the IE logo in the address bar and flip the switch beside “Open this page in Internet Explorer mode next time.” Or you can open Settings > Default Browser, then select “Add.” In the “Add a Page” dialog that pops up, type in the address of the site you’d like to always use in IE mode, then click “Add.”

From now on, that website will always load in IE mode for compatibility purposes. Due to possible security risks, Microsoft recommends not using IE mode longer than necessary. Also note that the site will be automatically removed after 30 days.
If you’re browsing with Microsoft Edge on Windows 10 or 11 and you visit a site that needs Internet Explorer to work properly, you’re in luck. Edge includes an “Internet Explorer mode” for compatibility. Here’s how to use it.
Warning: Microsoft Edge’s modern browsing engine is more secure (and faster) than Internet Explorer’s old one. You should only use IE mode when absolutely necessary: For example, to access old websites that were designed for Internet Explorer and don’t work properly in modern web browsers.
First, open Edge. In the upper-right corner of any window, click the ellipses button (three dots) and select “Settings” in the menu that appears.
When the Settings tab opens, expand the window until you see the Settings sidebar. Click “Default Browser.”
In Default Browser settings, locate the “Internet Explorer Compatibility” section. Using the drop-down menu beside “Allow sites to be reloaded in Internet Explorer mode,” select “Allow.” Then click “Restart” to restart your browser.
After Edge reloads, browse to the site you’d like to load in Internet Explorer mode. To switch to IE mode, click the ellipses (three dots) button and select “Reload in Internet Explorer mode.” Or you can right-click the tab and select “Reload tab in Internet Explorer mode.”
Edge will reload the site in the Internet Explorer engine, and you’ll see an Internet Explorer icon in the left side of the address bar reminding you that you’re in IE mode.
You’ll also see a strip across the top of the website just under the address bar. If you want to reload the site in Edge, click “Open in Microsoft Edge.” You can also click “Show in Toolbar” to add an icon to your toolbar that you can click to leave IE mode.
Now you can browse as you normally would. To leave Internet Explorer mode, close the tab or click the “Leave IE mode” icon in the toolbar if you added it in the step above.
If you’d like to permanently open a certain website in IE mode, click the IE logo in the address bar and flip the switch beside “Open this page in Internet Explorer mode next time.” Or you can open Settings > Default Browser, then select “Add.” In the “Add a Page” dialog that pops up, type in the address of the site you’d like to always use in IE mode, then click “Add.”
From now on, that website will always load in IE mode for compatibility purposes. Due to possible security risks, Microsoft recommends not using IE mode longer than necessary. Also note that the site will be automatically removed after 30 days.
The OneDrive icon on the File Explorer navigation bar can only be removed via registry key.
Please open Registry Editor and go to the following path:
HKEY_CURRENT_USER\Software\Microsoft\Windows\CurrentVersion\Explorer\Desktop\NameSpace
You may see these 2 keys under the NameSpace.

Right click on the {018D5C66-4533-4307-9B53-224DE2ED1FE6} and delete it.
WARNING: Using Registry Editor incorrectly can cause serious problems that may require you to reinstall your operating system. Microsoft cannot guarantee that problems resulting from the incorrect use of Registry Editor can be solved. Use Registry Edit at your own risk.

As you can see, the OneDrive Personal folder is no longer there.
To disable personal OneDrive, you can follow the steps below:
- Exit from personal OneDrive if you find a white cloud icon in the task bar.
- Hit Windows + R , type regedit and click Enter to open Registry Editor.
- Go to Computer\HKEY_CURRENT_USER\Software\Microsoft\OneDrive and find DisablePersonalSync, set the value to 1
Note: If you cannot find DisablePersonalSync ,you can create one directly.
Just right click below and click New > DWORD(32-bit) Value, type DisablePersonalSync as name and double click it, set value to 1 click OK.


In the Windows 10 Anniversary Update, version 1607, Microsoft removed Cortana’s on-off switch. But it’s still there, if you know where to look. Use this tweak to make Windows search strictly local.
In the Windows 10 Anniversary Update, version 1607, Microsoft removed the on-off switch for Cortana. But the setting is still available if you know where to look
As with most things Windows, you can remove the search button or box completely if you’re really convinced you won’t use it. Right-click the taskbar and then click Cortana > Hidden.
With that option set, you can still access Cortana’s full feature set by tapping the Windows key and typing. If you want to turn off all of Cortana’s features, leaving only the ability to search for local apps, files, and settings, you need to make a simple registry edit.
On a system running Windows 10 Pro or Enterprise edition, you can use Group Policy to apply this setting across multiple machines in an enterprise network; on a single PC, use the local Group Policy Editor, gpedit.msc, to open the policy Computer Configuration > Administrative Templates > Windows Components > Search > Allow Cortana and set it to disabled.
On a system running Windows 10 Home, you need to make a manual edit to the registry. Find the key HKLM\Software\Policies\Microsoft\Windows\Windows Search (you might need to create this key if it doesn’t exist), and then create the DWORD value AllowCortana and set it to 0.
In either case, this change applies to all user accounts on the PC you’re configuring. Sign out and sign back in and you’ll notice that the text in the search box has changed from “Ask me anything” to “Search Windows.” Clicking in the search box displays only a simple prompt. In addition, Cortana’s Notebook is unavailable, only a few settings are available when you click the gear icon, and there’s no option to search the Web from the search box.
First, it’s useful to understand that the April 2018 update for some users caused a partition which should normally remain hidden to become visible, and Windows automatically assigned it a drive letter. This partition, which is nearly full, then provokes Windows to repeatedly warn you of low disk space.
The solution is to remove the drive letter assigned to that partition. This will make it invisible again (as it should be), and the low disk space warnings will cease.
This solution was provided by Tiero Chi, a Microsoft agent. Here are the steps. Follow them carefully:
Microsoft is aware that previously-hidden partitions are improperly being assigned drive letters after installing the April 2018 Update. As a result, they now appear in Disk Management and File Explorer. These partitions are typically recovery partitions used by the Windows Recovery Environment or by the Original Equipment Manufacturer. It is not recommended that you attempt to delete or reformat these partitions as this may have adverse effects on your ability to recover Windows. Microsoft is currently working to address the issue in a future Windows Update, and we’ll update this thread when a solution becomes available.
(Update 5/14/18: The solution that will soon be released via Windows Update will only prevent this issue from occurring for devices that install the April 2018 Updateafter the solution is released. If you’ve already installed the April 2018 Update and are experiencing this issue, you’ll need to follow the steps below if you want to hide these partitions.)
Although you can safely ignore these partitions, if you prefer do away with the low disk space warnings and hide the partitions so they no longer appear in File Explorer, you can do so by manually removing the partition’s assigned drive letter. To do this:
1. Select the Start button, type cmd and then right-click Command Prompt in the search results and select Run as administrator.
2. In the Administrator: Command Prompt window, type diskpart and press Enter.
3. Type list volume and press Enter.
4. Make note of the volume number for the drive letter you want to remove. For example, if the drive letter you want to remove is Drive “G”, note the volume number for Drive G.
5. Type the following command, and press Enter.
select volume <volume number>
When typing this command, in place of <volume number>, substitute the volume number you made note of in Step 4. In the example above, if the volume number for drive G is 5, you would type: select volume 5
6. Type the following command and press Enter.
remove letter=<drive letter>
When typing this command, in place of <drive letter>, substitute the drive letter you want to remove. In this example, you would type: remove letter=G
7. Close the Command Prompt window.se. I did these steps and can confirm that it works.
Here is how you can fix that:
1. Open Start, type: CMD
Right click CMD
Click Run as administrator
Type in at the prompt OR Copy and Paste these one at a time : (Hit enter after each)
2. Type Diskpart and click through the UAC prompt
3. If you have more than one hard disk in your PC…
a. Type List disk and note the number of the disk on which Windows 10 is installed
b. Type Select Disk N where N is the number of the Windows installation disk
4. Type List Volume to see which partition has the offending drive letter. It will be a drive with a size measured in MB (Megabytes)
5. Type Select Volume N where N is the number of the UEFI partition that’s been given a drive letter, in my experience so far it’s the one called “Recovery”
6. Type Remove Letter=N where N is the drive letter (maybe D or E) assigned to the UEFI partition
7. Type Exit to close Diskpart
8. Close the Command Prompt Window
Have you recently downloaded the Windows 10 ISO and then decided to find out what update version of Windows 10 it is. Fear not the steps below will help you find out…
- Firstly, you need to mount the ISO – In Windows 10 you can do this by just right clicking on the ISO and then selecting mount.
- Then open up a command prompt as administrator and run the following command:dism /Get-WimInfo /WimFile:E:\sources\install.esd /index:1
(E is the drive letter for the mounted ISO file)
The product key for new computers that come preinstalled with Windows 10 has the product key stored within the motherboard firmware. Users can retrieve it by issuing a command from the command prompt.
- Press Windows key + X
- Click Command Prompt (Admin)
- At the command prompt, type wmic path SoftwareLicensingService get OA3xOriginalProductKey
This will reveal the product key.
Introduction
When using the Evaluation version of Windows Server, the desktop displays the current build and the time until the end of the grace period (Windows License valid for 180 days).
At any time, you can display the time until the end of the grace period for an evaluation version of Windows Server:
Slmgr /dli
Name: Windows, ServerStandardEval edition
Description: Windows Operating System, TIMEBASED_EVAL channel
License Status: Licensed
Timebased activation expiration: xx min (xx days)
You can see the product name, description (TIMEBASED_EVAL channel), and activation expiration time.
There is a way to extend your Windows Server Evaluation for additional 180 days using the command:
slmgr /rearm
You can extend your Windows Server trial period up to 5 times. Thus, the maximum lifespan of Windows Server Free Trial can be extended to 3 years = 180 days * 6. However, under the terms of using Evaluation versions of Microsoft, you shouldn’t use the trial version for commercial purposes or productive tasks.
After the expiration of the trial period, Windows Server starts requiring activation and shutting down every hour.
The desktop background will turn black, and a notification “Windows Licenses is expired” will appear in the lower right corner.
Trying to enter a new licence will obviously fail as the version isn’t supposed to be used as licenced servfer.
However, you can upgrade it to use an existing licence key as follows.
You can use DISM to make sure that you are using the Windows Server Evaluation edition. Open an elevated command prompt and execute the command:
DISM /online /Get-CurrentEdition
As you can see, the Current Edition line indicates that the current Windows version is — ServerStandartEval.

Get the list of Windows Server editions to which you can upgrade your current Eval edition:
DISM /online /Get-TargetEditions
Editions that can be upgraded to:
Target Edition : ServerStandard
Target Edition : ServerDatacenter

As you can see, the current ServerStandardEval edition has been upgraded to the following Windows Server 2016 / Windows Server 2019 editions: ServerDatacenter or ServerStandard.
Windows Server 2016: Converting Evaluation to Licensed Version
To upgrade Windows Server Evaluation to a full version, you need to use the public KMS (GVLK) key for Windows Server 2016. The conversion is performed via the command prompt using the built-in DISM tool. For example, to upgrade your Eval edition to the Retail version of Windows Server 2016 Standard, use the command:
dism /online /set-edition:ServerStandard /productkey:WC2BQ-8NRM3-FDDYY-2BFGV-KHKQY /accepteula
Always use the Microsoft GVLK key when upgrading the Windows Server edition. You will later replace it with your own product key.
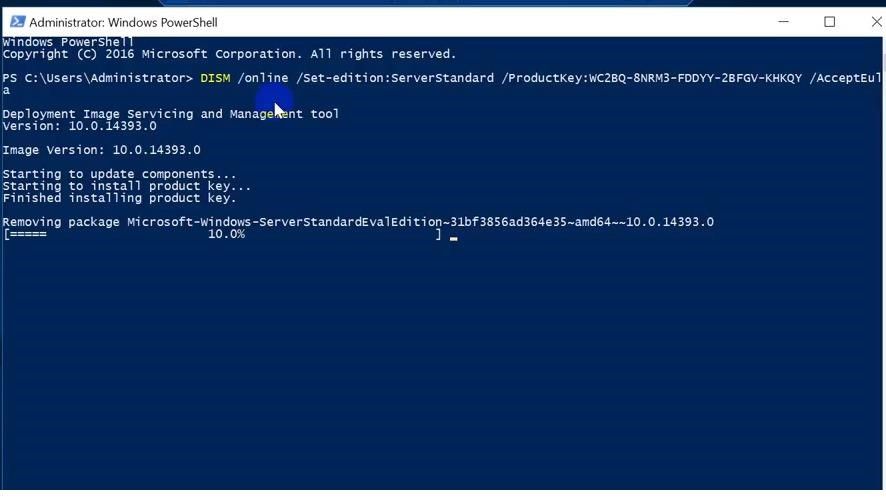
After you run this command, wait for the message Command completed successfully (in some cases it may take several hours!!!). After that restart your server and make sure you have a full Standard edition installed.
winver.exe

The upgrade was successfull
Given below are the simple steps involved in the changing the date created attributes of a file in MAC:
Open Terminal Application
Set the Desired Date Information: Type “touch -t 202210251033”
Get at the File you wish to alter: Open a Finder Window, locate the file you want to change and drag it to the Terminal window
Here is an example of what the line should look like:
touch –t 200005151125 /Volumes/Mac\ HD/Pictures/myfile.jpg
Press enter to make the change
You can use Terminal command for Directory Services to Delete a User Account
Type the following command to list all users.
$ sudo dscl . list /Users
With the account name confirmed, type the following command in the Terminal to delete the account directory entry from your system:
$ sudo dscl . -delete /Users/Account_name
In this command, replace the word “Account_name” with the account name you found and confirmed in above step.After the account is deleted, the user’s home folder will still be on the disk in the /Macintosh HD/Users directory. At this point you can simply delete the directory to fully remove all items that were associated with the removed account.
A ZIP file bundles and, if possible, compresses multiple other files into a convenient and smaller package. However, the ZIP file may still be quite large and cumbersome to transport over the Internet. Split a large ZIP file into multiple parts to allow it to be more easily transported to customers or business partners over the Internet via email or a file-sharing service. You can do this from the terminal window of your OS X Macintosh.

Existing Zip File
New Zip File
The Mail app bundled with Mac OS X is an excellent email client, but if you have a giant mailbox that has been in use for a long time you may encounter some peculiar problems with sluggishness, message content issues, and searching irregularities. Usually these issues are of distinct types; search errors where some messages don’t come up in results when you know they should, unusually slow behavior when performing mail searches, or just general mail content problems, where an opened message appears blank, incomplete, corrupt, or is otherwise displayed improperly.
Fortunately these issues are very easy to correct thanks to a two step process of forcibly rebuilding the mailbox, and then forcibly reindexing all messages contained within the OS X Mail app.
Before proceeding, you may wish to consider clearing out the Spam/Junk mail folders contained in Mail app to help speed up both reindexing and rebuilding.
Rebuilding the Mailbox
Rebuilding a mailbox in Mail for Mac OS X is very simple:
(If you don’t see the Rebuild option or it is greyed out, close any compose windows and select the inbox in the primary Mail app window)
This rebuild process can take a few minutes, or even an hour or more depending on how large your inbox and sent messages folders are.
An important note: this may cause significant bandwidth use for mailboxes configured with IMAP or Exchange, because the locally stored messages are removed and then redownloaded from the remote mail server. That can make this task unsuitable for users who are connected to the internet using a data capped connection, like a smartphone with hotspot.
Repair & Reindex All Messages in Mail app
You may encounter an alert from Mail app telling you that the mailbox must be repaired, but you can also do this manually. This is particularly helpful if the search functions of the Mail app have become unreliable.
- Launch Mail app if you have not done so already
- Pull down the Mailbox menu, then choose “Rebuild”
(If you don’t see the Rebuild option or it is greyed out, close any compose windows and select the inbox in the primary Mail app window)
This rebuild process can take a few minutes, or even an hour or more depending on how large your inbox and sent messages folders are.
An important note: this may cause significant bandwidth use for mailboxes configured with IMAP or Exchange, because the locally stored messages are removed and then redownloaded from the remote mail server. That can make this task unsuitable for users who are connected to the internet using a data capped connection, like a smartphone with hotspot.
Repair & Reindex All Messages in Mail app
You may encounter an alert from Mail app telling you that the mailbox must be repaired, but you can also do this manually. This is particularly helpful if the search functions of the Mail app have become unreliable.
- Quit out of Mail app and go to the Finder
- Hit Command+Shift+G and go to the following path:
~/Library/Mail/V2/MailData/
- Delete every file that begins with “Envelope Index” (optional but recommended: back up these files to the desktop just in case something goes awry)
- Close the MailData window, then relaunch Mail app to force reindexing
Like rebuilding the mailbox, the reindexing process can also take a while, depending on how large the mailbox is and how much mail is stored on the computer. Be prepared for a lengthy re-indexation if you have tons (thousands+) of messages in Mail app. When finished, try the search or perform the task that you had issues with before and things should be working as usual again.
- Boot into Single User Mode: Start/restart your Mac. As soon as you hear the startup tone, press and hold ⌘ + S until you see a black screen with white lettering. (If you end up back on the login screen after a flash of the black screen with white lettering, enter your password and it will return to the black screen.)
- Check and repair the drive by typing
/sbin/fsck -fythen ↩ enter – as directed by the on-screen text. - Mount the drive as read-write by typing
/sbin/mount -uw /then ↩ enter. - Remove the Apple Setup Done file by typing
rm /var/db/.AppleSetupDonethen ↩ enter. - Reboot by typing
rebootthen ↩ enter. - Complete the setup process, creating a new admin account.
Open the file /System/Library/CoreServices/SystemVersion.plist in a text editor; this file contains the version of Mac OS X installed on the drive. This file is not present on systems running Mac OS X 10.1.
- Log in as an admin user.
- Open Terminal from the Utilities folder.
- Type or paste this command in Terminal:sudo languagesetup
- Press Return.
- When prompted for a password, enter an administrator account password and press Return.
- A list of available languages is displayed. Type the number that appears next to the language you want to use, then press Return.
- Quit Terminal.
The next time you log out or restart your Mac, the login screen uses the language you set.